Virtual machines are convenient, but as we've seen, they don't support 3D games or other graphics-intensive applications. There are significant limitations with hardware, too: a Virtual PC VM won't recognise USB devices, for instance (apart from a mouse or keyboard).
And of course you can't properly assess Windows 7's boot time, file copy speed or any other performance measurement by running it in a VM, because it's an artificial environment that will always run significantly slower than a full PC. If you want the full Windows 7 experience, your best option is to create a separate hard drive partition where the operating system can be installed and dual-boot.
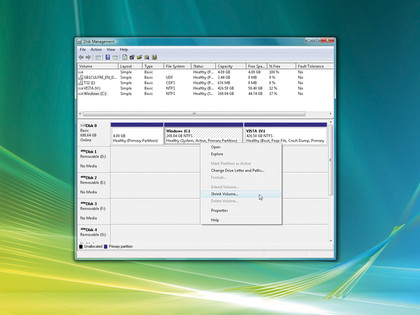
When your PC boots you'll then see a new menu with the option to launch either Windows 7 or your current OS. Choose the one you need and it'll have complete access to your hardware with none of the limitations of a VM. If you're running Windows Vista then you can partition your hard drive directly from the Disk Management console. This shouldn't cause any problems at all, but there are no guarantees, so back up your hard drive before you start.
Then launch 'diskmgmt.msc', right-click your current hard drive partition, select 'Shrink volume' and choose the size you'd like to allocate to Windows 7. Again, this should be 25GB at an absolute minimum, and ideally a lot more. Give Windows 7 as much drive space as you can spare.
Now right-click the unallocated space, select 'New simple volume', and work through the wizard, allocating all of the available space to your new partition and performing a quick format with the NTFS filesystem. And that's it: the partitioning is done. Partitions on XP If you have Windows XP, life is a little more complicated, as you'll need to download third-party software to carve up your drive.
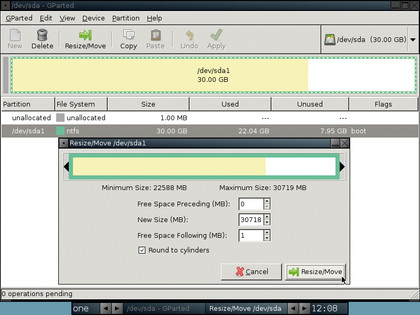
Fortunately, there are plenty of free and very capable options. GParted is one of the best out there. Download the GParted ISO disc image and use it to create a bootable CD. Your disc-burning software should have an option to handle ISO images, but if you have problems then use a third party tool like ISO Recorder, which is available from here.

GPARTED: GParted provides an easy way to create and resize XP hard drive partitions
Sign up for breaking news, reviews, opinion, top tech deals, and more.
Before you continue, make sure you've backed up your hard drive, or at least any critical data on it. GParted is one of the most heavily used and respected drivepartitioning tools around, so it's most unlikely that your hardware will come to harm, but any lowlevel drive tinkering of this sort has some level of risk attached. As always it's better to be safe than sorry with this sort of thing.
When you're ready to go, boot from the GParted CD, choose the 'Default settings' option and then select 'Don't touch keymap'. Next, pick your language and accept the default operating mode, then locate the partition you're going to resize, select 'Resize/Move' and choose how much space you'd like to give Windows 7 (remember, we suggest 25GB or more).
After that, click 'Resize', then 'Apply'. Next, right-click over the unallocated space and select 'New' from the dropdown menu to see the Create New Partition dialog. Make sure both 'Free space' values are set to zero and that the 'New size' value is set to the maximum partition size, so your new partition is using all the available space.

PARTITION SIZE: Give your partition enough space to fit Windows 7 on easily or you could run into troubles
Choose 'Primary partition' from the 'Create As' list, select 'NTFS' as your filesystem and click 'Add' then 'Apply' to create a Windows 7-sized space on your hard drive. Job done.
Install Windows 7
Now boot your PC from a Windows 7 DVD and work through the installation process. Be sure to choose the 'Custom (advanced)' installation type, then point the set-up program to your empty new partition.
Because you're installing Windows 7 to your real hard drive as opposed to a virtual machine, be very careful here. Click the wrong partition and your current Windows files will be replaced by Windows 7 – not what you wanted at all.
Once you've passed this stage, there's very little more that you need to do. The Windows 7 setup program requires fewer clicks than previous versions, and it gets its work done more quickly too, so a dual–boot installation could be finished in 15 to 30 minutes. You can then start Windows 7 from your PC boot menu, or the Virtual PC console, and start discovering exactly what all the fuss is about.
Virtual machine vs dual-boot
So which Windows 7 trial method is best, then? In most cases, we prefer virtual machines. They're slower and don't fully support 3D graphics or USB devices, but in general that really doesn't matter. We think most people want to explore Windows 7 to try out the new taskbar, libraries, Start menu, search tools or Explorer, not play Crysis or watch Freeview on a USB TV tuner.
If that sounds like you, then it makes sense to try Windows 7 in a virtual machine before you do anything else. However, if after trying the virtual machine you find that you want a more complete look at Windows 7 – or if you know that you'll be frustrated by the lack of functionality within a VM – give dual-boot a try.
It's surprisingly easy, particularly if you're running Vista, and you could have a system running in under 45 minutes.